
By Thomas P. Turner
‘Describe the most common scenario for stall-related crashes.’ When I ask this in presentations, invariably the first response is ‘the base to final turn.’ When I ask pilots to list stall scenarios, take-off, baulked landing, missed approach and circling instrument approach all make the list—but the audience always says a power-off stall during the base to final turn is the most common type of accidental stall.
Always one to base my educational message on data, I went to the mishap record to find out what actually causes stalls that have led to crashes. What I found is somewhat surprising.
Loss of control
According to the Australian Transport Safety Bureau (ATSB), in 2014, the number of aircraft ‘control problems’ involving general aviation (GA) aircraft was the highest [it has been] in the last 10 years. This was significantly greater than the 10-year average; however, it was consistent with the general trend (since 2010) of increasing aircraft control occurrences in GA.
Around 70 per cent of these occurrences involved aeroplanes and greater than 50 per cent involved aircraft conducting private/business/sports operations. There were 60 accidents—two fatal and six serious injury accidents—and four serious incidents. Of these occurrences, 22 were investigated by the ATSB. The most common control issues were loss of control, hard landings and wheels-up landings.
The United States’ ATSB equivalent, the National Transportation Safety Board (NTSB) notes an even stronger trend. According to the NTSB, in the past decade nearly 47 per cent of all fatal aircraft crashes involved ‘loss of control’. Of those cases, nearly 80 per cent were aerodynamic stalls, weighted heavily toward stalls in the early stages of a baulked landing (‘go-around’) of instrument missed approach. In fact, loss of control in flight (LOC-I) is involved in the greatest majority of fatal air crashes in all categories of aircraft operation that fall under the NTSB’s purview—recreational, general aviation, instructional flight, business flying, corporate (professional flight crew) operations and even commercial airline flights.
Whoever’s data you use, it’s clear that we need to know a lot more about stalls and spins, and how to avoid them.
Critical angle of attack
We are taught that stalling is a function of flying a particular speed. Intellectually we know that stalls are ‘truly’ a function of angle of attack (AoA). The disconnect stems from the way stalls are presented in the aircraft handbook and training, almost universally in terms of indicated airspeed.
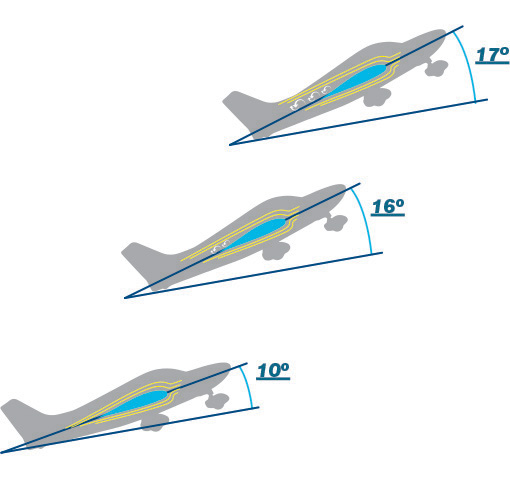
Another reason we commonly misunderstand stalls is that the diagrams in most training materials look as though stalls always occur at a very nose-high attitude. This is the diagram from the US Federal Aviation Administration’s Aircraft Flying Handbook. Nearly identical drawings appear in pilot training texts around the world.
This image illustrates that in most general aviation airfoil designs the stall begins at about 17 degrees angle of attack—the so-called critical angle of attack. The picture makes it seem like the aircraft must be in a very nose-high pitch attitude to achieve this critical angle of attack. Intellectually we all know—because we’ve been told to know—that stalls can occur at any airspeed, and any pitch attitude. But because we rarely see this presented in training, and virtually never see it illustrated in print, we are conditioned to expect stall indications only when the aircraft’s nose is pointed high in the sky. That how we’re really taught, and how we’re usually trained and evaluated about stalls.
Yet when stalls truly occur they often do so at lower pitch attitudes. If a stall occurs during the base-to-final turn or on final approach, it seems very unlikely the nose would be above the horizon at all. In typical power on, departure stall practice, the nose of the aircraft is very high before the stall occurs. The American Practical Test Standards even have a note for instructors advising that the nose be brought up to no more than 30 degrees up when training power-on stalls. In a baulked landing or missed approach, or a high-density altitude take-off, the actual stall may occur at a much lower pitch attitude.
The trouble is that if we think the nose must be very high in order for the aircraft to stall, and an actual stall occurs while the aircraft is at a much lower pitch attitude, lowering the angle of attack and beginning a stall recovery is the furthest thing from our minds if the horn begins to sound or the wing begins to burble.
Nose-down stalls
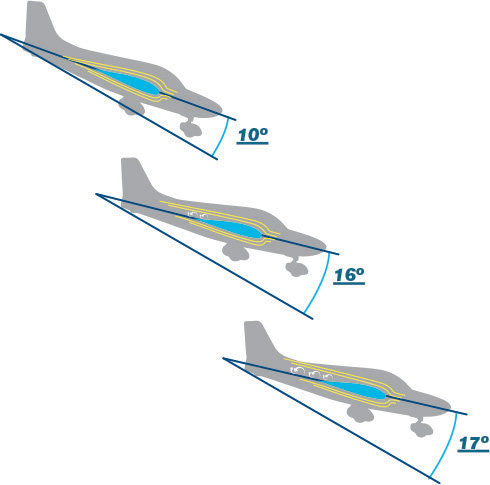
To better understand how an aircraft pointed downward can reach the critical angle of attack, I tilted the standard critical angle of attack diagram to correspond to a final approach descent. I then superimposed a stylised aircraft around the wing pictures. My modified diagram clearly shows how an aircraft may stall during final approach or the beginning of a baulked landing/missed approach, with the nose pointed far further downward than the Federal Aviation Administration’s diagram suggests, because even at those lower pitch attitudes the angle of attack may be great.
Imagine you’re on final approach with the power near idle, and you detect that you’re below glide path and aimed for a point short of the runway. If you attempt to ‘stretch’ the glide by adding back pressure on the elevator controls, the angle of attack increases even as the nose is below the horizon. My amended critical angle of attack illustration also shows what happens to AoA if you begin a baulked landing or missed approach by pulling up before adding power.
In either case, critical angle of attack may be reached while the aircraft’s nose is still pointed below the horizon. The aircraft may stall even while you still have the runway in sight—it’s a powerful lesson to demonstrate this to a pilot for the first time. It really creates an impression that a pilot may be much more likely to stall inadvertently than they think would be the case before seeing this in flight.
Similarly, an aggressive pitch-up on take-off can result in a high AoA without attaining the unrealistically high pitch attitudes we see in power-on stalls in the manner we usually practise. If the aircraft is heavy and/or the density altitude is high, reduced thrust-to-weight ratio makes the aircraft even less spritely in climb…so a little more pitch up means even greater AoA.
If the aircraft isn’t climbing as well as it does under more ‘normal’ circumstances, your reaction may be to try to force it to climb by raising the nose even higher.
I modified the standard critical angle of attack diagram a second way to show AoAs during an aggressive take-off and initial climb. It illustrates that the nose does not need to be radically nose-up to reach the critical angle of attack, even at full power.
When I demonstrate this to pilots in heavy, high-performance aircraft like late-model Beechcraft A36 Bonanzas and in Beech Barons, the stall warning horn begins sounding steadily at a 7 degree to 10 degree-up pitch attitude. That’s the normal lift-off and initial climb pitch for those types of aeroplanes!
What about spins?
There’s an interesting characteristic of angle of attack in most general aviation aircraft: critical AoA, the onset of a stall, begins at a 17 degree AoA or so, but maximum lift development occurs just before reaching the critical angle of attack. Among other things, this explains why the aircraft is more likely to stall when we’re trying to make a short-field take-off or landing, if we are just a little too aggressive.
So far in our discussion we’ve assumed that the aircraft’s wings are both at the same angle of attack at all times. This is true as long as you keep the aircraft in coordinated flight by applying the right amount of rudder and keep the slip/skid ball or indicator centred. If you are not in coordinated flight, however, one wing’s AoA will differ from the others. Consider that, when you apply rudder, the aircraft moves (‘yaws’) around its vertical axis. Seen from above, in a yaw one wing will be advancing relative to the point where the vertical axis exits the aircraft; the other wing will be receding relative to that point.
A little geometry shows that the receding wing has a higher angle of attack than the advancing wing. If the aircraft is being yawed (from insufficient or excessive rudder for the current condition of flight) and the receding wing reaches its critical angle of attack, the advancing wing will be near its maximum lift generation angle when the stall occurs. A stall on one wing and maximum lift on the other means the high lift side will flip the aircraft over, causing the rotation of a spin. If you don’t lower the angle of attack to unstall the receding wing, the aircraft will continue to rotate from this major imbalance of lift.
The result is a stable, well-developed spin … the natural outcome of stalling while the aircraft is yawing. Put another way, don’t stall and the aircraft won’t spin; don’t yaw and a stall will not turn into a spin. To recover from a spin, lower the angle of attack (push forward on the controls) and stop the yaw (apply rudder opposite the direction of spin until rotation stops).
Stalls and spins, and how to avoid them
Here’s how you can mitigate the risks of having a stall/spin crash:
- With a qualified instructor, practise stalls regularly to maintain a ‘feel’ for them, to be more likely to detect impending stalls during distracting situations. This includes realistic presentation of stalls from power-off glides and last-minute baulked landings/go-arounds, to simulate the situations that historically lead to stalls. This is not the way stalls are usually presented in pilot training.
- If you find yourself low on glidepath, add power to reduce the rate of descent, instead of raising the nose to try to ‘stretch’ your glide.
- Add power before raising the nose during a baulked landing or missed approach.
- In all procedures, employ precise power and pitch attitude control to avoid high angle of attack conditions.
- Use slightly lower pitch attitude targets at high aircraft weights and/or high density altitudes.
Be meticulous about maintaining rudder coordination at all times (unless intentionally slipping in a crosswind or to lose altitude at a constant speed). If you demand coordinated flight from yourself at all times, you’ll instinctively apply the proper rudder to remain coordinated at high angles of attack.

When I was learning to fly in 1967, I was taught to use the stick or elevator to control speed, and throttle to control descent angle. Has this changed? I was also taught spins and stalls.
[…] FlightSafety Austrália: “Angle & attitude: stall/spin crashes, and how to avoid them“. Excelente material, vale muito a […]
[…] FlightSafety Austrália: “Angle & attitude: stall/spin crashes, and how to avoid them“. Excelente material, vale muito a […]