By Thomas P. Turner
To recover from a stall, your instinct is to use ailerons to raise a dropped wing. But this could result in the aircraft going into a snap roll. What routine should you practice to avoid this result?
I’m in the right seat conducting flight instruction. As the pilot receiving instruction (PRI) begins a practice stall, I move my hands and feet toward the controls. As the stall occurs, I’m ready to intercede if needed in all three axes: elevator, rudder and aileron.
All pilots should know why I’m ready to push forward on the elevator control. Most understand, or at least can parrot back, why I’m concerned about the rudder. But in my experience few pilots think about the vital role aileron control plays in stall recovery and spin avoidance, and how incorrect aileron input can be as bad as stomping on the wrong rudder pedal.
To understand why this is so, and ensure you control all three axes properly at slow speeds and high angles of attack, let’s go back to basics, then build on this level of understanding and action.
Angle of attack
You know the story: angle of attack (AOA) is defined as the angular difference between the chord line of the wing and the relative wind. As you increase AOA, airflow begins to detach from the upper surface of the wing and this turbulent flow reduces lift while it creates drag. Increase AOA beyond some angle—the critical angle of attack—and the wing stalls. A stall can occur at any airspeed and pitch attitude. Got it? But do you really understand it?
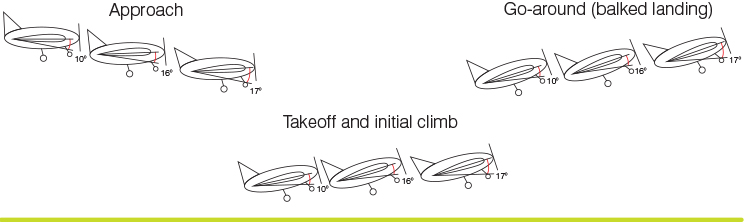
Most manuals include a diagram similar to Figure 1. A relatively low AOA, say 10 degrees, results in smooth airflow across the entire top (and bottom) of the wing, generating lift. Pull back on the elevator to increase AOA toward 16 degrees or so and air cannot make the tight turn across the top of the wing; at some point the airflow detaches, reducing lift-generating area and increasing drag. Some additional lift is created by impact with the bottom of the wing and the rebounding force of that impact, so total lift continues to increase. However, at around 17 degrees AOA in most airplanes, airflow detachment is so great that total lift is insufficient to sustain flight. The wing stalls.

The problem with this diagram and the way we usually practice stalls is that they strongly suggest the wing, and therefore the nose of the airplane, must be pointed very high for a stall to occur. And yet we learn the wing can stall at any attitude. How is that so?
A simpler definition may make more sense: angle of attack is the difference between the direction the aircraft is pointed and the direction it is going. If the aircraft is level, climbing or even descending and you pull back on the elevator, it does not instantaneously change direction. Inertia causes it to continue in the direction it was going and then arc into a new direction that, if power or speed is sufficient, will change to approximately the new attitude. To illustrate this, draw an aircraft around the wings in the standard diagram, taking into account the small angle of incidence—slight ‘leading edge up’ of the wing as mounted onto the fuselage. Then rotate the entire diagram to show how the critical AOA can be reached during approach, take-off and go-around (balked landing), while the aircraft’s attitude appears close to normal (Figure 2).
If you make elevator input smoothly and gradually, there is little change in AOA during the transition. Pull aggressively, however, and the AOA change is initially greater because the airplane’s nose changes direction faster than the aircraft can change direction of flight. You ‘load’ the wing. This is why stall speed increases with an increase in G load and may enter an ‘accelerated’ stall. This can happen in a turn (where we usually practice accelerated stalls), but may also occur in wings-level flight in climb and even descent: for instance, if you pull and change the direction the nose is pointed, faster than the aircraft can change its direction of flight.
Bank angle alone does not increase stall speed. If the aircraft’s nose is permitted to pitch downward and G load doesn’t increase, stall speed and AOA do not increase, regardless of bank. Knowing that pulling on the controls against the airplane’s direction of flight increases G load and consequently AOA, makes it easy to understand why pushing forward on the stick or yoke—unloading the wing—is the first, right thing to do in stall recovery.
Angle and lift
Another diagram that has deeper meaning than many pilots are taught is Lift vs. AOA changes (Figure 3). Most instructors focus on the critical AOA at the 17 to 18 degrees point. The stall indeed occurs at the critical angle of attack. But reduce AOA just one degree below critical and the wing is generating its maximum lift. This is a vital concept to understanding the need for aileron control near and at stall AOA.
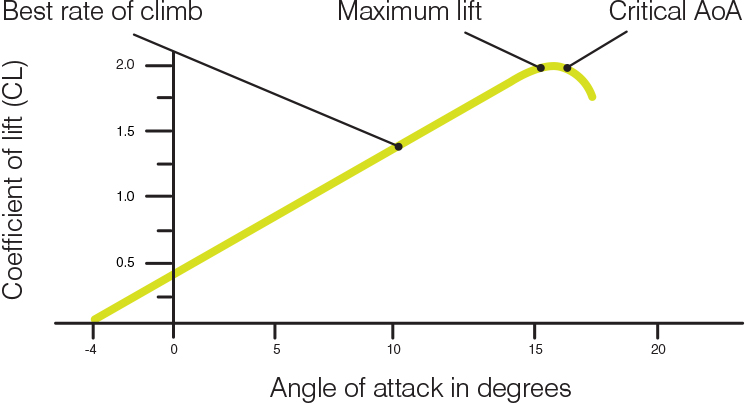
I’ve added the maximum lift AOA and an approximation of AOA for VY speed (best rate of climb) to Figure 3. Also interesting: lift is generated beyond critical AOA—it’s just the lift is less and the drag is so great that the wing can no longer support the airplane. It takes a significant push on the elevator control to get the wing back into flying range and recover from this stall.
Asymmetry
Everything in this article so far assumes the angle of attack is the same on both wings and the aircraft is in coordinated flight. The savvy among you know the reason uncoordinated flight is hazardous at slow speeds and/or increased G load is that when the aircraft is slipping or skidding, angle of attack is not the same on both wings. One wing may stall before the other. Let’s look at how this happens.
Figure 4 shows the balance of force in coordinated (left), slipping (center) and skidding (right) flight. In coordinated flight and assuming one G, the aircraft travels essentially in the direction its nose is pointed. AOA remains constant and is the same on both wings.
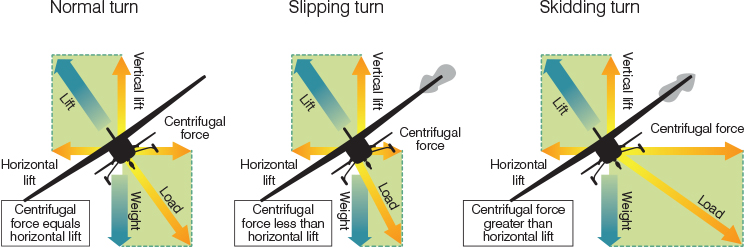
In a slip the tail of the aircraft is displaced—or yawed—toward the outside of a turn, or to one side of a straight flight path if balanced by control input. The outside wing is traveling faster through the air than the inside wing but is also forced into a higher angle of attack. If you decrease speed or increase back pressure (or both), the high wing will stall first. This tends to level the wings and also reduce the outside wing’s angle of attack. A stall out of a slip is only somewhat more hazardous than a coordinated stall.
By contrast, in a skidding turn the tail is yawed toward the inside of the turn. The inside wing has a higher angle of attack. If that wing’s AOA reaches critical and stalls, the other wing is at an AOA very near that for maximum lift. The low wing drops and maximum lift on the high wing snaps the aircraft over into a spin. Intentionally flying an aircraft into this condition is the basis of a snap roll. For most of us. it is an extremely undesirable manoeuvre.
How do you maintain coordination so both wings stall at the same time? With rudder, of course. But lack of rudder coordination is only one cause of AOA asymmetry between one wing and the other. There’s another control that can severely aggravate stall characteristics and incite a spin—a hazard that, in my opinion, is not frequently taught.
Ailerons and AOA
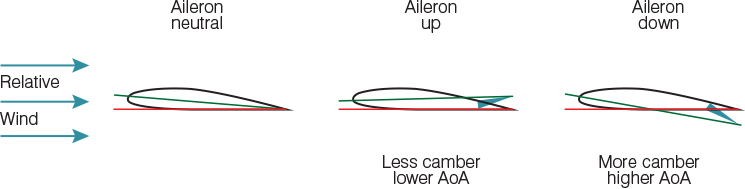
Let’s go back to the original definition of angle of attack: the angular difference between the chord line of the wing and the relative wind. ‘Chord line’ is a line drawn from the leading edge to the trailing edge. The curvature of the wing along this line is called the wing’s camber, and that’s important to this part of the discussion.
When you deflect an aileron, you’re moving the trailing edge of that portion of the wing up and down. This changes the camber of that part of the wing, hence the angle of its chord line. Since the relative wind hasn’t changed (at least yet), the angle of attack of that portion of the wing changes. When an aileron is deflected upward it has less camber and a lower AOA. Deflected downward, it has more camber and a higher AOA. Since ailerons act in opposition—that is, when one goes up the other goes down—moving ailerons creates an asymmetry in AOA between the span of each wing that includes the ailerons.
Say you’re slowing the aircraft and/or increasing aft elevator pressure. The wings’ AOA increases. Now you add some aileron deflection—introducing asymmetry between the two wings’ angles of attack. The wing with the downward-deflected aileron may reach critical AOA and stall while the wing with the upward-deflected aileron is still generating maximum lift. When the stall breaks, the aircraft can spin toward the ‘down’ aileron. This can happen even if the rudder ball is centered—the asymmetry of AOA, and the spin, is caused by ailerons, not by rudder.
Here’s the real danger: you’re wings level and stall the wing, intentionally or not. If a wing drops, from lack of rudder coordination or propeller turning forces, the correct response is to push the elevator control to unload the wing while leveling the wings with opposite rudder. However, you naturally interpret a wing drop as a turn and the instinctive response is to turn back toward level flight—using ailerons. For example, the left wing is the one that drops. If you respond by turning the yoke or moving the stick to the right, the right aileron goes up and the left aileron goes down. The left wing’s AOA increases, sustaining the stall, while the right wing’s AOA decreases, potentially lowering it enough to return to maximum lift generation. The aircraft snap rolls toward the downward wing.
This is why it’s so important to condition yourself to keep the ailerons perfectly neutral during stall recovery. It’s not natural to do that and your every instinct is to use ailerons to raise a dropped wing. It takes practice to do this. But pushing the elevator to unload the wing, using rudder to hold or return to wings-level flight and rigidly holding ailerons neutral, must become your new instinctive response to a stall. You may get away with using ailerons in stalls sometimes, and the effect differs in one type of aircraft to the next, but the danger is always there if you use ailerons while recovering from a stall.
It’s vital not only to maintain rudder coordination at high angles of attack and during stall recovery, but also to maintain neutral ailerons in or near stalls even in coordinated flight.
Clarification
The feature ‘Rudder, ailerons, stalls and spins’ in the Autumn edition of Flight Safety Australia attracted comment from readers.
Some readers highlighted the dangers of seeking to level wings in a stalled condition by either rudder or aileron. It is critical for recovery that the first action is to push the control column forward to unstall the wings. Rudder should be used to prevent the nose of the aeroplane yawing (or further yawing) into the direction of the stalled wing and assist in the coordinated return to level flight as noted later in this article.
The following sentences attracted particular comment:
- In a slip the tail of the aircraft is displaced—or yawed—toward the outside of a turn, or to one side of a straight flight path if balanced by control input.
- By contrast, in a skidding turn the tail is yawed toward the inside of the turn.
The words ‘outside’ and ‘inside’ should be transposed in the sentences.
CASA has published a new Advisory Circular for spin avoidance and stall recovery training. The recommended procedure to recover from a stall with a wing drop is:
- apply forward movement of the control column to unstall the wing
- apply rudder to prevent the nose of the aeroplane yawing into the direction of the dropped wing
- ailerons should be held neutral until control is regained, when the wings should be levelled using coordinated inputs
- apply power and adopt an attitude to minimise further height loss. With experience, power may be introduced earlier in the recovery sequence.
- *Read the new Advisory Circular AC 61-16 Spin avoidance and stall recovery training at: casa.gov.au/ac

Comments are closed.