Go-arounds should be a routine exercise for pilots, but getting them right needs practice
By Thomas P Turner
When do you fly a go-around? If you’re like most pilots your answer may be, ‘when the instructor or examiner tells me to’.
We learn how to go around while preparing for a pilot examination and may practice them on flight reviews. Almost universally we perform a go-around on command – when an instructor or examiner tells us to. Outside of training and evaluation, unless it’s something obvious – an animal on the runway or an aircraft taxiing past the hold line – if we go around at all, we tend to do so only when it’s almost too late.
Yet failing to go around or delaying a go-around decision until the safe completion of the manoeuvre is in doubt, is a common contributor to hard landings, runway excursions and overruns. How can we quantify the advisability of a go-around?
In the slot
There’s an option that’s still included in some glass cockpit avionics – depiction of the desired flight path as a series of rectangles or ‘windows’ projected ahead of the aircraft on a primary flight display. This so-called ‘Highway in the sky’ (HITS) system seeks to simplify flight path management by giving the pilot an easy target for even complex manoeuvres – simply keep the aircraft inside the boxes like a video game.
With synthetic vision, this turns instrument flight into an electronic ‘visual’ process. The HITS windows are fairly wide in cruise, but they grow progressively narrower as an aircraft descends funnel-like toward a runway. HITS was all the rage around the turn of the century but the concept never really took off. Whether you have such a system in your aeroplane or, like almost all of us, you do not, the idea of narrowing tolerances that lead to a good landing – being what is sometimes called ‘in the slot’ on final approach – is still useful.
This in turn suggests a set of objective and measurable criteria not only in the landing flare, but also to predict the quality of your upcoming landing as you come down final approach. You are looking both for your aircraft’s current state, that is, how close it is to performance targets (which we’ll review in a moment), but also gauging the aeroplane’s trend, that is, whether it will continue to stay on performance targets as you get closer to the ground or will diverge.
For example, you may be precisely on a visual glidepath when you glance at the red-and-white PAPI lights. Your state is good. But, if the aircraft is too slow you’ll descend more steeply than the glidepath calls for. Your trend is to descend steeply and land short.
Evaluating your aircraft’s state and trend means that if you are not meeting the landing success criteria, you can make corrections before getting too close to the runway. If the need for correction is too great or you’re too close to the ground to correct in time, you can detect this and begin your go-around sooner.
Going around is as natural a part of flying as landing itself.
Landing criteria
What criteria should you be looking for on final approach? Beginning at about 500 feet above aerodrome elevation – about the height at which you turn onto finals in a visual circuit and often about where you’ll make your final landing flap selection – purposefully check whether you are meeting all of these landing criteria. The aeroplane should be:
- On speed. You are at the correct airspeed that will result in passing through the final approach or 50-foot speed as you cross the runway threshold. Most pilot operating handbooks (POHs) publish a recommended 50-foot speed that is around 1.3 times stall speed in the landing configuration (1.3 VSO). This speed often changes with aeroplane weight (because weight changes change stall speed); you may apply small airspeed corrections to account for wind gusts. This does not mean you be at that airspeed at 500 feet AGL and maintain that speed all of the way until you begin your flare – few of us fly a constant speed approach from that height. But you should be only slightly above the 50-foot speed, perhaps 5 to 10 knots at most in light aeroplanes, and (importantly) on
a smooth trend to arrive at the correct speed at the proper point crossing the approach end of the landing surface. - In configuration. The flaps are set as you desire for the landing and if the aircraft is a retractable type, the landing gear is confirmed down. Supporting the configuration criteria, the power is set as normal or expected and the aeroplane’s pitch attitude should be normal for final approach. If you must push the nose down to get the aircraft to descend, you need less power than normal and/or the airspeed is too fast for your usual attitude; therefore, power setting, flaps and (as appropriate) landing gear configuration are the first places to look.
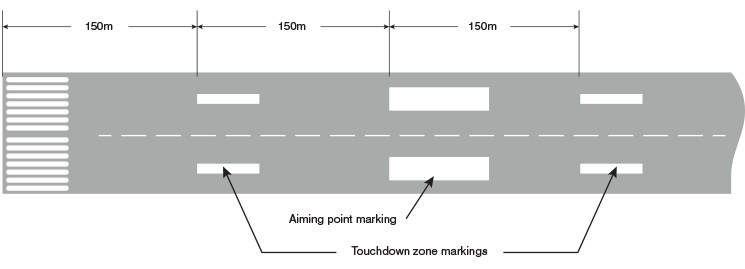
- On glide path. A constant-angle glide path to the point you begin the flare is what defines a ‘stabilised’ approach. This may be defined by an electronic glideslope from an ILS or derived by GPS, a visual glidepath following a VASI, PAPI or similar guidance, or simply a stationary aim point you select on the runway that is within the touchdown zone. The aiming point is usually identified by a pair of thick white parallel lines approximately 300 metres from the runway threshold. The touchdown zone is a length of runway represented by pairs of narrow white parallel lines that can extend from both before and beyond the aiming point markings as illustrated in the accompanying diagram from the AIP.
This criterion may be the ultimate use of state and trend on final approach. You’re evaluating whether you are in a position where a constant angle descent will take you directly to your aim point, and that your airspeed and configuration are such that you will continue to descend at that angle until you begin your flare.
- Aligned with the runway centerline. The aeroplane is aligned with the extended runway centerline such that you will touch down with the centerline between the main wheels with zero sideslip. Some pilots prefer a wing-low forward slip for alignment on final approach. Others like to come down finals in a crab into the wind, ready to ‘kick it out’ with rudder during the flare. In reality most pilots do a combination of the 2, crabbing at least partway down final approach and transitioning to a wing-low attitude for touchdown. Compensating for crosswinds is a technique, with some room for variation. In the context of landing criteria, however, if you are having difficulty maintaining runway centerline alignment in the last few hundred feet of descent, you will likely have difficulty landing on the runway centerline without putting a side-load on the landing gear.
Instead of subjectively gauging your landing approach or delaying a go-around decision until you’re in the flare – or later – think in terms of your state and trend using these objective landing criteria. Ask yourself if you are on speed, in configuration, on glidepath and in alignment beginning at about 500 feet above touchdown and continuing all the way to your flare. If in addition to confirming that the landing surface is clear and, at a tower-controlled aerodrome, that you are cleared to land, if you do not meet one or more of these landing criteria and cannot establish a trend to meet them before beginning your flare, make your go-around decision then. Don’t wait until you find yourself close to the ground too fast, too slow, out of configuration or drifting out of runway alignment.
In the flare
Despite your best efforts you may begin your flare from a good final approach state and trend, only to have something begin to go wrong. A gust of wind may cause drift. You may misjudge your flare and begin to sink, or balloon upward with a loss of airspeed, bounce or otherwise find you will not touch down smoothly in your intended touchdown zone. You may see an obstacle on the runway or another aircraft may pass the hold line. You should initiate a go-around if you’re not down before you pass your intended touchdown zone regardless of cause – how many times have you heard of an aeroplane floating half the runway length or more, then running off the end of the runway or stalling in a panicked pull-up? Margins are slim because you’re very slow and close to the ground. But a smooth transition from flare to initial climb power and speed is still very safe if you are practised.
Go-around
CASA’s Flight Instructor Manual Aeroplane provides guidance on flying a go-around. It identifies four points of emphasis:
- Full throttle or take-off power. The objective in a go-around is to enter a Vx to VY climb – Vx (best angle of climb) to VY (best rate of climb) – depending on the presence of obstacles. Attempting to climb without full power can dangerously increase angle of attack from a condition where the aeroplane is already slow, draggy and close to the ground. I’ve seen this often as an instructor – perhaps thinking they are protecting the engine or limiting the aerodynamic effect of powering up, many pilots apply power very slowly or do not go to full power. If you need to go around, advance the throttle at the same rate you do for a normal take-off.
- Speed while still in landing configuration. Most POHs don’t mention it, but often the best angle and best rate of climb speeds are somewhat lower in the landing configuration than with a normal take-off flap setting. If you use the proper pitch attitude for VX or VY, the speed should be about right given the drag of extended flaps. As you ‘clean up’ the airframe, the aircraft will accelerate to more familiar target airspeeds.
- Raising flap. If you’ve applied power and attained the proper attitude, you don’t have to be in too much of a hurry to raise the flaps. Some POHs recommend making incremental reductions in flap for a smooth, consistent climb out.
- Trim change. An aeroplane will seek the indicated airspeed for which it is trimmed. In many aircraft, especially those that are loaded nose-heavy, as you trim on final approach the trim setting will be more nose-high than the take-off setting. When you apply full power, propeller blast over the elevator increases air flow and makes the trim ‘think’ the aeroplane is flying faster that it really is. In that case the trim raises the nose to slow back to the trimmed airspeed (flow), sometimes quite aggressively. You may need to be ready to push forward on the controls to prevent the nose from rising higher than the attitude required for initial climb.
A related issue: Applying full power requires a corresponding application of rudder. Improper rudder input may lead to loss of directional control, often a rolling, skidding turn to the left because of increasing left-turning tendencies that may result in banking or turning into obstacles or the ground. The first moments of even a well-executed go-around happen at a high angle of attack; uncoordinated flight is a common component to stalls. According to the US Aircraft Owners and Pilots Association, about 20 per cent of all stalls in the circuit that result in a reported accident happen in the initial stages of a go-around. Hesitance to add power, the trim change and the changing rudder requirement of a go-around are undoubtedly major factors in this record.
It’s not enough to pass the test and fly a go-around only every couple of years.
Quantifying the go-around
It’s not enough to pass the test and fly a go-around only every couple of years when tasked by an instructor. Consciously ask yourself if you’re in the slot, judging your aeroplane’s state and trend all the way down final. By quantifying your performance, you can make the go-around decision before you are at the highest risk of loss of control.
Going around is as natural a part of flying as landing itself – or it will be, if you evaluate landing criteria every time and occasionally practice the go-around task.
 The flight instructor manual is available at: casa.gov.au


Comments are closed.